Are you a beginner looking to dive into the world of bracelet making? Bracelet crafting is not only a fun and creative hobby but also a great way to express your personal style. With a wide range of materials and techniques available, it can be overwhelming to know where to start. Fear not! In this beginner’s guide, we will walk you through the process of creating beautiful bracelet patterns. From selecting the right materials to mastering basic techniques, this article will provide you with all the information you need to get started.
1. Getting Started: Materials and Tools
Before you begin creating your own bracelet patterns, it’s essential to gather the necessary materials and tools. Here’s a list of the basic supplies you’ll need:
1.1 Beads and Charms
Beads and charms are the heart and soul of any bracelet design. They come in various shapes, sizes, and materials, including glass, metal, wood, and plastic. Experiment with different colors and textures to create unique and eye-catching patterns.
1.2 Stringing Material
Selecting the right stringing material is crucial for the durability and aesthetics of your bracelet. Popular options include nylon thread, silk cord, elastic cord, and beading wire. Consider the weight of your beads and the desired flexibility of your design when choosing the appropriate stringing material.
1.3 Findings and Clasps
Findings and clasps are essential for securing your bracelet. They come in a variety of styles, such as lobster clasps, toggle clasps, and magnetic clasps. Ensure you have the appropriate findings and clasps that match your chosen stringing material.
1.4 Tools
To create beautiful bracelet patterns, you’ll need a few basic tools. These include wire cutters, crimping pliers, round-nose pliers, and flat-nose pliers. These tools will help you cut and shape your materials, attach findings, and add finishing touches to your designs.
2. Design Inspiration: Exploring Different Styles
Now that you have your materials and tools ready, it’s time to draw inspiration for your bracelet patterns. Here are a few popular styles you can explore:
2.1 Charm Bracelets
Charm bracelets are a classic choice for creating personalized jewelry. You can start with a simple chain or bracelet base and add charms that represent your interests, hobbies, or memories. Charms can be easily attached using jump rings or lobster clasps.
2.2 Beaded Bracelets
Beaded bracelets offer endless possibilities for creativity. You can experiment with different bead sizes, shapes, and colors to create intricate patterns. From simple stringing techniques to more advanced beadweaving stitches like peyote or herringbone, there’s a technique for every skill level.
2.3 Friendship Bracelets
Friendship bracelets are not only trendy but also a great way to showcase your friendship and bond with others. These bracelets are typically made using embroidery floss or thread and various knotting techniques like the classic chevron, spiral, or candy stripe patterns.
2.4 Leather Bracelets
Leather bracelets provide a rustic and bohemian look. You can combine leather cords with beads, charms, or metal embellishments to create unique and stylish designs. Experiment with different braiding techniques or try adding a focal point with a large pendant or gemstone.
3. Basic Techniques: Stringing and Knotting
Now that you have an idea of the style you want to create, let’s dive into some basic techniques to bring your bracelet patterns to life.
3.1 Stringing
Stringing is the foundation of many bracelet designs. Start by cutting your chosen stringing material to the desired length, leaving a few extra inches for attaching the clasp. Thread your beads onto the string in your desired pattern, making sure to leave a small gap between each bead. Once you’ve threaded all your beads, attach the clasp using jump rings or crimp beads and a crimping tool.
3.2 Knotting
Knotting is commonly used in friendship bracelets and leather bracelets. To create a simple knot, take two strands of thread or cord and cross them over each other. Bring the end of one strand under the other and pull it through the loop created. Repeat this process, alternating the starting strand, until you reach your desired length. For leather bracelets, you can use different knotting techniques like the square knot or the lark’s head knot.
4. Advanced Techniques: Beadweaving and Macramé
Once you’ve mastered the basics, you can challenge yourself with more advanced techniques like beadweaving and macramé.
4.1 Beadweaving
Beadweaving involves using a needle and thread to create intricate patterns and designs with beads. Techniques like peyote stitch, right-angle weave, and brick stitch allow you to create complex and visually stunning bracelet patterns. Beadweaving requires patience and precision but offers endless possibilities for creativity.
4.2 Macramé
Macramé is a technique that involves knotting cords to create intricate patterns. You can use various knots like the square knot, half-hitch knot, or lark’s head knot to create beautiful and textured bracelets. Macramé bracelets can incorporate beads, charms, or even gemstones for added flair.
5. Adding Personal Touches: Customization and Embellishments
One of the best parts of creating your own bracelet patterns is the ability to add personal touches and embellishments. Here are a few ideas to make your designs truly unique:
5.1 Birthstone Charms
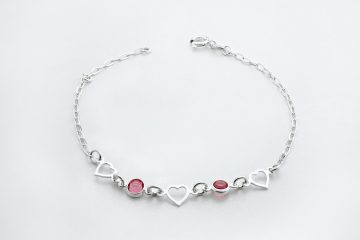
Incorporate birthstone charms into your bracelet patterns to add a personal touch. Birthstones are associated with each month and can be easily attached using jump rings or beading wire. These charms not only add a pop of color but also make the bracelet more meaningful.
5.2 Letter or Initial Beads
Spell out your name or initials using letter beads. These beads can be threaded onto your bracelet design to create a customized message or monogram. Choose beads in different colors or styles to make your design stand out.
5.3 Tassels and Pendants
Add tassels or pendants to your bracelet for an extra touch of elegance. Tassels can be made using embroidery floss or silk cord, while pendants can be attached using jump rings or beading wire. These embellishments create movement and visual interest in your design.
5.4 Mixed Materials
Experiment with mixing different materials in your bracelet patterns. Combine metal beads with gemstones, leather with silk cord, or wood with glass beads. Play with contrasting textures and colors to create a visually appealing and unique piece of jewelry.
Conclusion
Creating beautiful bracelet patterns is an exciting journey that allows you to express your creativity and style. By selecting the right materials, exploring different styles, mastering basic and advanced techniques, and adding personal touches, you can design bracelets that are not only stylish but also meaningful. So grab your tools, unleash your imagination, and start crafting your own stunning bracelets today!
FAQs
1. What is the best stringing material for beginners?
For beginners, elastic cord or nylon thread are great choices as they are easy to work with and provide flexibility for various bracelet designs.
2. How do I choose the right size for my bracelet?
To determine the right size, measure your wrist circumference and add an extra inch for a comfortable fit. Remember to consider the thickness of your beads or charms when measuring.
3. Can I use different bead sizes in one bracelet design?
Absolutely! Mixing different bead sizes adds dimension and visual interest to your bracelet patterns. Just ensure that the beads you choose are compatible with your stringing material.
4. How do I attach a clasp to my bracelet?
To attach a clasp, use jump rings or crimp beads along with appropriate pliers. Simply insert the jump ring or crimp bead through the loops of your stringing material and secure it tightly.
5. How can I fix a mistake in my bracelet pattern?
If you make a mistake, don’t panic! You can carefully undo the knots or remove the beads until you reach the point where the mistake was made. Take your time and be patient while correcting the error, as it’s all part of the learning process.


